 Gothic Home Decor
Ever walked into a bedroom and felt instantly wowed by a bed that seems to hover magically above the floor? That’s the allure of a floating bed frame DIY project. These designs create an illusion of weightlessness, making small spaces feel bigger and modern vibes pop. If you’re handy with tools or just eager to try, building your own floating bed frame DIY saves hundreds compared to store-bought versions, which often run $500 or more.
I remember my first attempt during a bedroom refresh last year. Skeptical at first, I ended up with a sturdy queen-sized frame that still looks brand new. No fancy workshop needed—just patience and the right steps. In this guide, we’ll cover everything from planning to finishing touches, so you can nail your floating bed frame DIY without headaches.
Why Choose a Floating Bed Frame DIY?
Floating bed frames trick the eye by hiding legs or supports beneath a sleek platform. The result? A minimalist, high-end look that’s trending in urban apartments and cozy homes alike.
The best part is customization. Tailor your floating bed frame DIY to fit any mattress size—twin, queen, or king—and match your style with stains or paints. Budget-friendly: Expect to spend $150-300 on materials, versus $800+ retail.
They’re space-savers too. No bulky legs mean easier cleaning and a grounded feel that opens up floor space. Plus, many builds support heavy loads, like 800+ pounds, when done right. If you’re revamping on a dime, a floating bed frame DIY delivers pro results with that satisfying “I built this” pride.
Planning Your Floating Bed Frame DIY
Start with measurements. Measure your mattress precisely—add 2 inches on each side for the frame. For a queen, that’s about 64×84 inches total.
Sketch a simple design. Most floating bed frame DIY projects use a box frame with hidden steel brackets or cantilevered wood supports for the levitate effect. Decide on height: 12-18 inches off the ground works for most.
Safety first: Calculate weight capacity. A queen mattress plus two adults equals 600-800 pounds minimum. Factor in plywood strength and bracket ratings. Check your room’s floor type too—concrete handles it best; reinforce weak joists if needed.
Budget time: A weekend project for solo builders, quicker with help. Gather inspiration from everyday woodworkers who’ve shared their floating bed frame DIY wins online—real stories emphasize sturdy joints over flashy looks.
Materials Needed for Floating Bed Frame DIY
Quality materials make your floating bed frame DIY last. Here’s a reliable list for a queen-sized build:
- Plywood sheets: Two 3/4-inch, 4×8-foot sheets for the platform and sides. Birch or furniture-grade resists warping. Pro tip: Opt for void-free plywood for smooth edges.
- Lumber: 2x4s or 2x6s for internal bracing—about 100 linear feet.
- Hidden brackets: Heavy-duty steel cantilever brackets (rated 500+ lbs each). Four to six do the trick.
- Screws and bolts: 3-inch wood screws (box of 100), 1/4-inch lag bolts for brackets.
- Slats: 1×4 pine boards for mattress support, spaced 3 inches apart.
- Finish: Wood stain, polyurethane sealant, sandpaper (80-220 grit).
Total cost? Around $200 at home centers. Source scraps if you’re thrifty—many floating bed frame DIY enthusiasts swear by reclaimed wood for character.
Tools Required
You don’t need a full shop for a solid floating bed frame DIY. Essentials include:
- Circular saw or table saw: For straight cuts.
- Drill with bits: For pilot holes and driving screws.
- Orbital sander: Smooths everything fast.
- Clamps: At least four bar clamps to hold pieces steady.
- Level and tape measure: Precision is key.
- Optional: Pocket hole jig for cleaner joints.
Rent if buying feels steep. I’ve built three floating bed frame DIY frames with borrowed tools—focus on sharp blades to avoid splintering.
Step-by-Step Assembly for Floating Bed Frame DIY
Break it into phases for manageability. Work in a garage or cleared space.
Build the Base Frame
Cut two 64-inch and two 80-inch plywood strips for the outer rim. Key point: Use 3/4-inch plywood doubled up for strength.
Assemble into a rectangle with wood glue and screws. Reinforce corners with 2×4 blocks. This forms the “floating” top—your visual centerpiece.
Install Hidden Supports
Attach cantilever brackets to 2×6 ledgers screwed into wall studs (locate with a stud finder). Bold safety note: Use lag bolts into at least two studs per bracket.
Position ledgers 16-18 inches high. The frame slips onto them, creating the hover effect. Test stability before full assembly.
Add Side Panels
Rip plywood for 12-inch tall sides. Attach flush to the base frame underside, hiding supports. Human touch: I chamfered edges for a softer look—small tweak, big style upgrade.
Mattress Platform
Lay slats across the frame, screwing into side rails. Space evenly for airflow—prevents mold. Load test: Jump on it gently; it should feel rock-solid.
Finishing Your Floating Bed Frame DIY
Sand thoroughly, starting coarse and going fine. Wipe dust, then apply stain in thin coats. Two polyurethane layers seal it against spills.
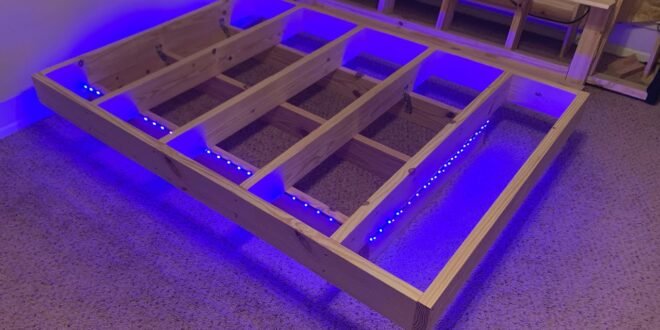
Lighting trick: LED strips under the frame amplify the floating illusion at night. Mount with adhesive for renter-friendliness.
Bed it up with linens and admire. My floating bed frame DIY transformed a drab room into a retreat—guests always ask for the how-to.
Customization Ideas for Floating Bed Frame DIY
Make it yours. Paint sides matte black for industrial chic, or carve headboard cutouts for whimsy.
Storage hack: Add drawers beneath using casters and plywood bins. Perfect for small spaces.
Upholster edges in fabric for softness. Scale up for a king floating bed frame DIY by widening materials proportionally. Experiment—each tweak personalizes the build.
Common Mistakes to Avoid in Floating Bed Frame DIY
Rushing measurements leads to wobbles. Double-check everything before cutting.
Weak walls? Skip wall-mounts; use floor legs disguised as plinths. Over-tightening screws strips wood—pilot holes save the day.
Skipping sealant? Humidity warps plywood fast. Learn from others: Uneven slats sag mattresses, so shim if needed.
Maintenance Tips for Long-Lasting Floating Bed Frame DIY
Tighten bolts yearly. Vacuum under the frame to dodge dust bunnies.
Rotate your mattress quarterly for even wear. Pro longevity tip: Reapply polyurethane every two years.
With care, your floating bed frame DIY endures a decade-plus. Mine’s held up through moves and kids jumping on it.
Benefits Recap: Why Your Next Project Should Be Floating Bed Frame DIY
Saves money: Custom build under $300.
Boosts skills: Woodworking confidence skyrockets.
Elevates style: Instant bedroom glow-up.
Impresses all: That wow factor never fades.
Diving into a floating bed frame DIY changed how I see home projects—empowering and fun. Small investment, massive reward.
In wrapping up, tackling a floating bed frame DIY isn’t just about furniture; it’s crafting a space that reflects you. Whether minimalist or bold, this build delivers floating magic on a real budget. Grab your tools, measure twice, and watch your bedroom transform. You’ve got this—what size bed are you starting with?